
How to connect to wifi networks on Windows 10
Sometimes, you may be wishing to connect to what is known as an ‘open network’, that is a network that everyone is free to access.
The problem arises when open an network requires authentication.
How to sign in to an open network that requires authentication on Windows 10
When you first log-on, or sign in to and ‘open network’, you’ll be presented with their log in requirements.
This may be entering a room number, in the case of a hotel. Maybe a password, if you’ve been required to register previously. In some cases, there may be forms you’ve filled out, or other information you’ve given which has given you access to the network.
This never seems to be a problem on ‘first login’.
On subsequent sessions, where the same sign in to network is required on Windows 10, you may find:
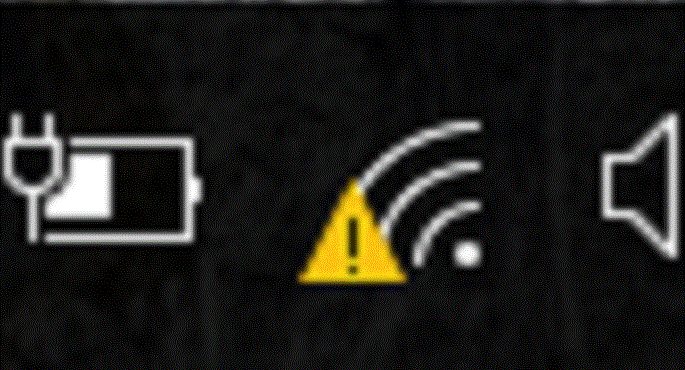
 No network access
This sign, no network access means Windows 10 has not activated it’s authentication screen, the screen you were taken to the FIRST time you signed into that open network.
That is very buggy and very slack on behalf of Windows network developers. But luckily, I am here to save the day.
What you want is to be taken to the authentication screen on that open network, authenticate, and get your free network access right?
I’ve seen may solutions to this on the web, including using the ‘ipconfig’ command.
None of them work.
This is the way to do it.
- Connect to the network you want.
- At the ‘no network access’ prompt, open your browser. In the address bar, type ‘go.microsoft.com/‘. Press enter.
- This will take you to the login screen for that particular open network.
Please ‘like’ this guide if you found it useful.
Related Reading

Most recently, this happened on the 21st July 2021. Unlike my experience below, many drivers were affected. Not just me. Amazon payments stop July 2021...
Top 14 tips for Amazon Flex drivers (UK). Map of Amazon Flex depots. Amazon Flex contract for drivers.

So….. Turns out the NHS, Fedex and a number of other companies and organisations have been hit by this same Ransomwear virus. According to Avast,...

If you’re planning a trip, or maybe living there as an expat, these are the apps you’re going to want to have installed to your...

Over the course of the last few weeks, I’ve been planning to upgrade the electrics of Bonnie Lady narrowboat. One of the first jobs has...